In part I of this article (which appeared in Jan issue), we dealt with the pre‐installation guidelines and in this part II, we will address the following two important steps:
- Installation procedures
- Post‐installation practices
Step II: Installation procedures:
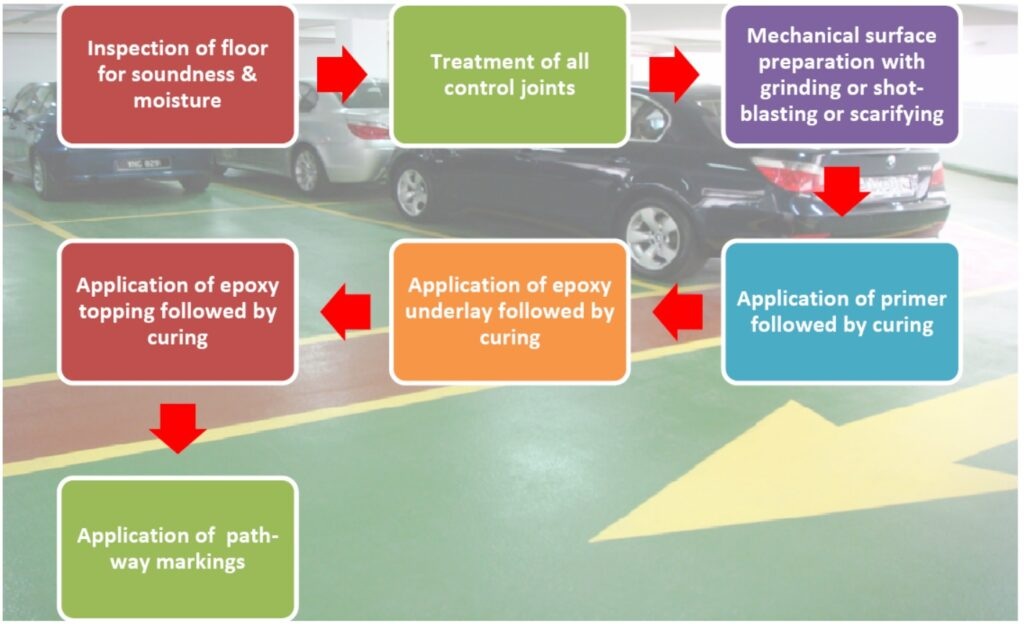
Once it has been established that the base floor is capable of receiving epoxy/PU topping (outcome of step I ), installation sequence is to be set in motion. Installation procedure is broadly classified into three important steps:
- Surface preparation
- Application of primer and underlay
- Application of topping
Let us discuss the above three steps in detail:
Surface Preparation:
This is the single most important step that determines the life of the flooring. Any slack in this step will adversely affect the quality and durability of the flooring.
Some of the questions that need to be answered before commencing the surface preparation are the following:
- What is the basic surface on which epoxy/PU topping needs to be applied?
- Vacuum de‐watered concrete (power‐trowelled)
- Manually trowelled PCC
- Cotta stone/Shabbat stone/Granite/Kadappa/Marble
- Ceramic tile/vitrified tile
- What is the status of the base floor?
- Clean or oil‐soaked
- Existence of cracks, powdery surface etc
- Soundness of the base floor and porosity etc
- What is the thickness of the topping proposed as the surface profile to be created is directly proportional to the thickness of the coating
The answers to the above questions will lead you to the following decisions:
- Proper equipment to be used
- Floor grinding equipment
- Scarifier
- Shot‐blasting equipment
- Extent of surface profile required
The following graph can be taken as a guideline to decide on both of the above questions:

The purpose of the surface preparation is to:
- Create a surface profile so as to create a mechanical key which increases adhesion strength
- Create a clean and dry base and remove loose particles
- Improve penetration of primer
- Removal of oil, grease and other contaminants that will impede bonding
- Remember the word “DCS”; Dry, Clean and Sound surface
Priming:
After the surface preparation, the second step is to ensure that the surface is primed properly. The application of priming is as important as that of surface preparation in ensuring the longevity of flooring and most likely ignored by most of the contractors. As you are aware, concrete consists of micro‐pores that typically do not allow penetration of fileer‐rich epoxy coatings. Hence, it is essential that the initial bonding is achieved by an epoxy primer that contains only resin and hardener and is of such viscosity so as to penetrate the pores of concrete thus creating a bond equivalent to that of spiked shoe on a soft floor. Thus, the concrete pores that are opened up by surface preparation get filled by a proper epoxy primer and increases the durability of the topping multi‐fold.
Depending on the porosity of the concrete, viscosity of the primer shall be properly chosen. Normally available epoxy primers will not adhere with vitrified tiles, polished marble/granite etc, which calls for specially formulated primers.
Once the primer layer is cured which typically can take 4 to 12 hrs depending on temperature and humidity, screed underlay has to be applied. It is strongly advised that screed underlay is applied over primer not later than 24 hrs. Once the primer layer is hardened, the inter‐phase bond between screed and primer can diminish. In case of delay in screed application, it is advisable to wipe the primed surface with solvent like Xylene, MIBK etc
When the total thickness of floor topping exceeds 3mm, it is preferable to do a 2mm self-leveling screed underlay followed by 1mm self‐leveling topping instead of 3mm topping together. Though this concept is being questioned by many, the argument in favour of doing a screed underlay has the following merits:
- The function of screed underlay is to be provide a strong base with excellent compressive strength and bond‐strength, while the function of topping is to provide abrasion resistance, chemical resistance, aesthetics etc. Thus it is prudent to formulate two different products to optimize the properties
- Leveling of undulated floors is much easier
- In essence, it can also reduce the overall price of the system
Topping:
Execution of topping is very similar to that of execution of self‐leveling underlay except the fact that topping contains a forth component i.e pigment. Pigment needs to be added to Component A (resin part), mixed well and component B & C are to be added sequentially.
Proper mixing machines need to be used to ensure homogeneity of the system and consequent development of desired properties. Do not allow mechanical movement for 48 hours and chemical exposure for 7 days.
Typical epoxy self‐leveling floorings


Post‐installation practices
Some Do’s and Don’ts
- Clean the floor regularly with a mop at least once a day.
- Do not allow loose sharp particles to be strewn on the floor and ensure to remove the same immediately.
- Check the wheels of the vehicles regularly to ensure that there are no sharp particles adhering on the wheels.
- Rectify the leaking pipes and joints immediately.(eg. Oil carrying pipes in machines)
- Avoid dropping of tools and tackles on the floor
- Avoid dragging heavy loads like machinery, wooden crates etc
- Periodically inspect the areas and rectify damaged areas immediately.
- Do not clean epoxy floors with acid
Conclusion:
Epoxy / PU floorings have been found to give an excellent service in various industries such as pharmaceuticals, food, automobile/auto‐ancillaries, textile, electronic and electrical industries, light engineering, chemical industries etc. However, it is important to ensure that the execution and maintenance have been done as per various standard procedures and I hope that this article helps in an in‐depth understanding of the same.
Authored – B.M.Nagarajan, Director, Neocrete Technologies Pvt. Ltd.
For more details, visit – www.neocrete.co.in